Suppose Cointool.app website is down or temporarily unavailable, yet you have to claim your XEN before it expires. The following guide will show you how to go about it using Etherscan.io.
Note: the following guide is for the Ethereum blockchain only, but it’s self-explanatory and fairly easily translatable to other chains. Note: The original Cointool guide for the BSC blockchain can be found here.
Export Cointool.app Addresses of your Claims
First, make sure you backup all your Cointool.app addresses by exporting them in MS Excel format.
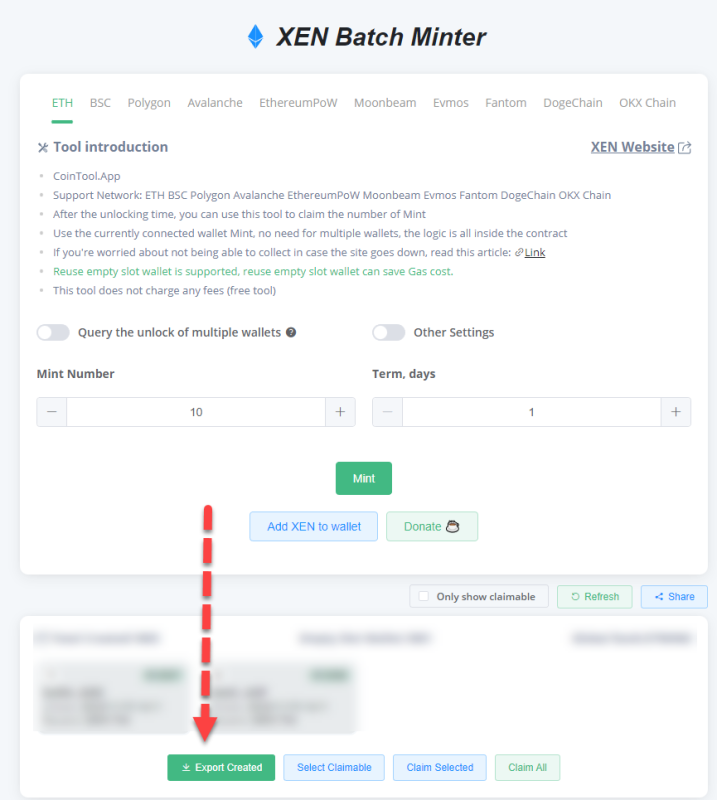
It’s simple to do so, just go to https://cointool.app/batchMint/xen website and in the ETH tab, scroll to the bottom of the page and click on the Export Created button.
Once the .xlsx file is exported, save the file somewhere safe, because without knowing the list of addresses associated with your claims on Cointool, you won’t be able to retrieve XEN, when Cointool.app website may not be available). This is what the page looks like and the button you should click on:
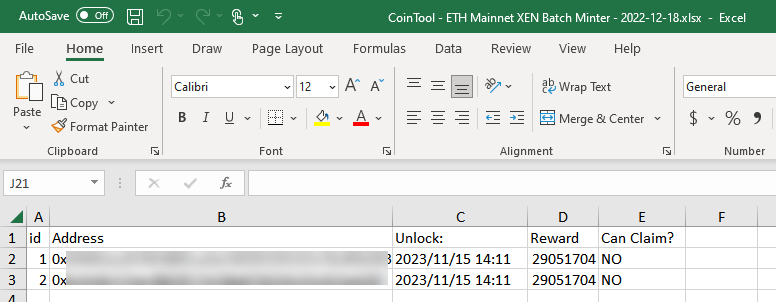
The output file in .xlsx format will look something like this, listing all IDs (these are the most important to keep), Addresses, Unlock Times, Estimated Rewards and Claim Status, created by the Cointool smart contract:
Prerequisite Information
Smart Contract Information for XEN and Cointool
Cointool’s XEN Batch Minter contract on Etherscan.io
Etherscan.io website is a block explorer for the Ethereum blockchain; and will most likely be up and running even if the Cointool.app website is down, allowing us to communicate with the Cointool XEN Batch minter contract deployed on the Ethereum blockchain even if the Cointool.app website is down or temporarily not available.
Following is the Etherscan page of the Cointool XEN Batch minter contract, which outlines all of the smart contract functions of the Cointool Xen Batch minter and that allows us (in absence of Cointool.app website availability) to communicate with any of the Cointool smart contract functions: https://etherscan.io/address/0x0de8bf93da2f7eecb3d9169422413a9bef4ef628#writeContract.
How to claim XEN using Etherscan.io website
Visit the https://etherscan.io/address/0x0de8bf93da2f7eecb3d9169422413a9bef4ef628#writeContract and unroll the option #6 (f function):
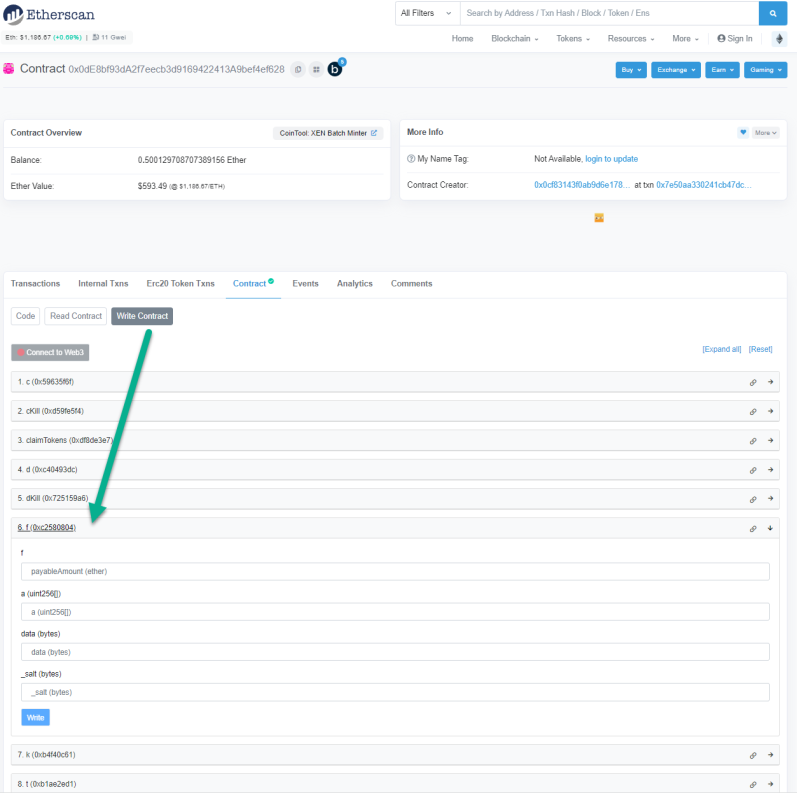
You’ll find 4 pieces of information we need to fill up on this page in order to claim the XEN associated with our wallet (as seen in the screenshot below):
f
a (uint256[])
data (bytes)
_salt (bytes)
The following are step-by-step instructions on how to fill up the above 4 fields
STEP 1
Set f to 0:

STEP 2
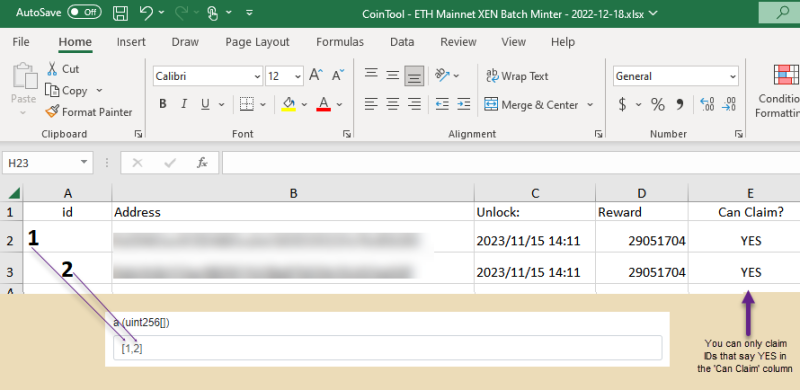
a (uint256[]) – this is a list of all Wallet IDs (that are claimable) – Displayed as an array.
The output should look like this, where each Wallet ID will be filled in using this format [wallet id 1 , wallet id 2,…]
STEP 3
STEP 3 – Manual Way
data (bytes) – This one is a bit more complex and will require you to edit the following data hexadecimal expression:
0x59635f6f000000000000000000000000{XEN ETHEREUM ADDRESS}000000000000000000000000000000000000000000000000000000000000004000000000000000000000000000000000000000000000000000000000000000441c560305000000000000000000000000{YOUR WALLET ADDRESS}000000000000000000000000000000000000000000000000000000000000006400000000000000000000000000000000000000000000000000000000
In the above code, you’ll need to replace XEN ETHEREUM ADDRESS with 0x06450dEe7FD2Fb8E39061434BAbCFC05599a6Fb8 however, please note, that the leading 0x needs to be removed, so it’ll become 06450dEe7FD2Fb8E39061434BAbCFC05599a6Fb8)
Secondly, YOUR WALLET ADDRESS with the address of the wallet from which you originally claimed the XEN on the Cointool website (most likely the address of your Metamask account – note: leading 0x also needs to be removed) ).
Here is an example how the data hex input should look like once filled up for an imaginary Metamask Ethereum wallet address: 0x0123456789abcdef0123456789abcdef0123456789abcdef:
0x59635f6f00000000000000000000000006450dEe7FD2Fb8E39061434BAbCFC05599a6Fb8000000000000000000000000000000000000000000000000000000000000004000000000000000000000000000000000000000000000000000000000000000441c5603050000000000000000000000000123456789abcdef0123456789abcdef0123456789abcdef000000000000000000000000000000000000000000000000000000000000006400000000000000000000000000000000000000000000000000000000
Once you’ve successfully edited the data hex, enter it into the data field:

STEP 3 – Automated Way
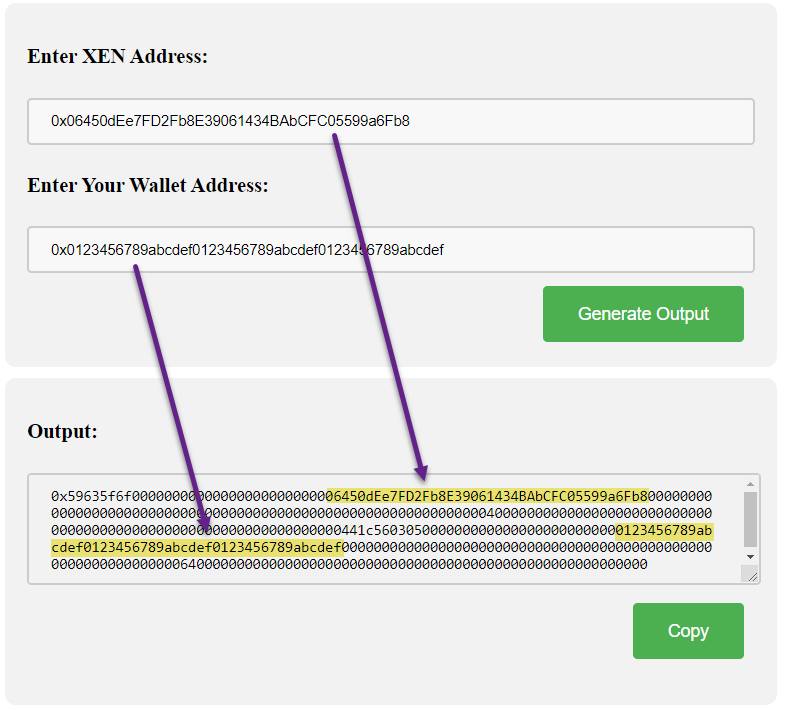
We recognize that the manual part above is a bit tricky, so to make it easier, we’ve created an automated tool that allows you to do the replacement of strings automatically. You can either go to this page to see the tool in action: https://jsfiddle.net/jarosciak/ew5gpsh9/
Once done, the output that you can copy and paste into the data field (based on my example entries for XEN address and wallet address) should look something like this. Just take it and copy the final output (the entire string) from the tool into the data field on Etherscan:
STEP 4
_salt (bytes) – this is the last of the four fields. Just enter 0x01 here. So it looks like this:

STEP 5 – Final Step
Once all fields are filled up, just press the WRITE button and claimable XEN from all accounts listed in the a field will be transferred over to the wallet address we specified earlier in STEP 4 (as part of the the data field)
